There are several ways Gradle stores information between builds to drastically reduce subsequent build times. You may be familiar with some of these methods, but what’s important is that they build upon each other gradually improving build speed. If you are only benefiting from one, then you have something to gain by also looking into the others.
build directory “cache” aka incremental builds
This is the build directory(ies) within your project where Gradle puts generated code and files. If you clean and run an assemble of your application, you can explore those directories to see what is being generated.
$ ./gradlew clean
$ ./gradlew app:assembleDebug
As an Android developer, the most familiar generated files are probably R.java files. build directory is also where 3rd party generated classes live, like those created by Dagger and Proguard. Even the generated .apk lives here.
If you have a multi-module project, you’ll see that each module has it’s own build directory.
project
|-- app
|   |-- build
|   |-- lib
|   `-- src
`-- library
    |-- build
    |-- lib
    `-- src
We started off by calling clean to delete the build directories to get a good sense of what gets put in these directories during assemble. In fact this is the only thing the clean task does. It doesn’t affect files outside your current project.
The first step to speed up our builds is to maximize the reuse of what Gradle puts in these directories. Gradle calls this reuse “incremental building.” If we were to assemble again, without cleaning and without changing any of the source files, we can get a good guess of what Gradle is “reusing”.
$ ./gradlew app:assembleDebug
As you can guess, since nothing changed in your code, hopefully Gradle reused all of these generated files and did not have to do any new work. Ideally the re-build took only a few seconds. Any more time than that and you should scan (or profile) your build to see what was not reused.
I won’t go into any detail about how scanning works, there are many great blogs about how it, but it’s essentially a matter of passing --scan when assembling:
$ ./gradlew clean
$ ./gradlew --scan app:assembleDebug
This will give us our initial baseline. We’ll run again without cleaning or changing any code:
$ ./gradlew --scan app:assembleDebug
You can inspect the generated HTML scan report of the second run to see which tasks were marked UP-TO-DATE. This means that Gradle did not have to run this task again. The best place to look is the “timeline” tab. (I found that scan reports are much more informative than profile reports, but you have to be willing to have that report hosted on Gradle’s site, which may not be your cup of tea).
The thing to look for is the steps that are not marked UP-TO-DATE and take relatively big chunks of time to complete. For me that’s this New Relic task. Your not-up-to-date tasks will be specific to your code. If you are lucky all of your tasks are already up to date.
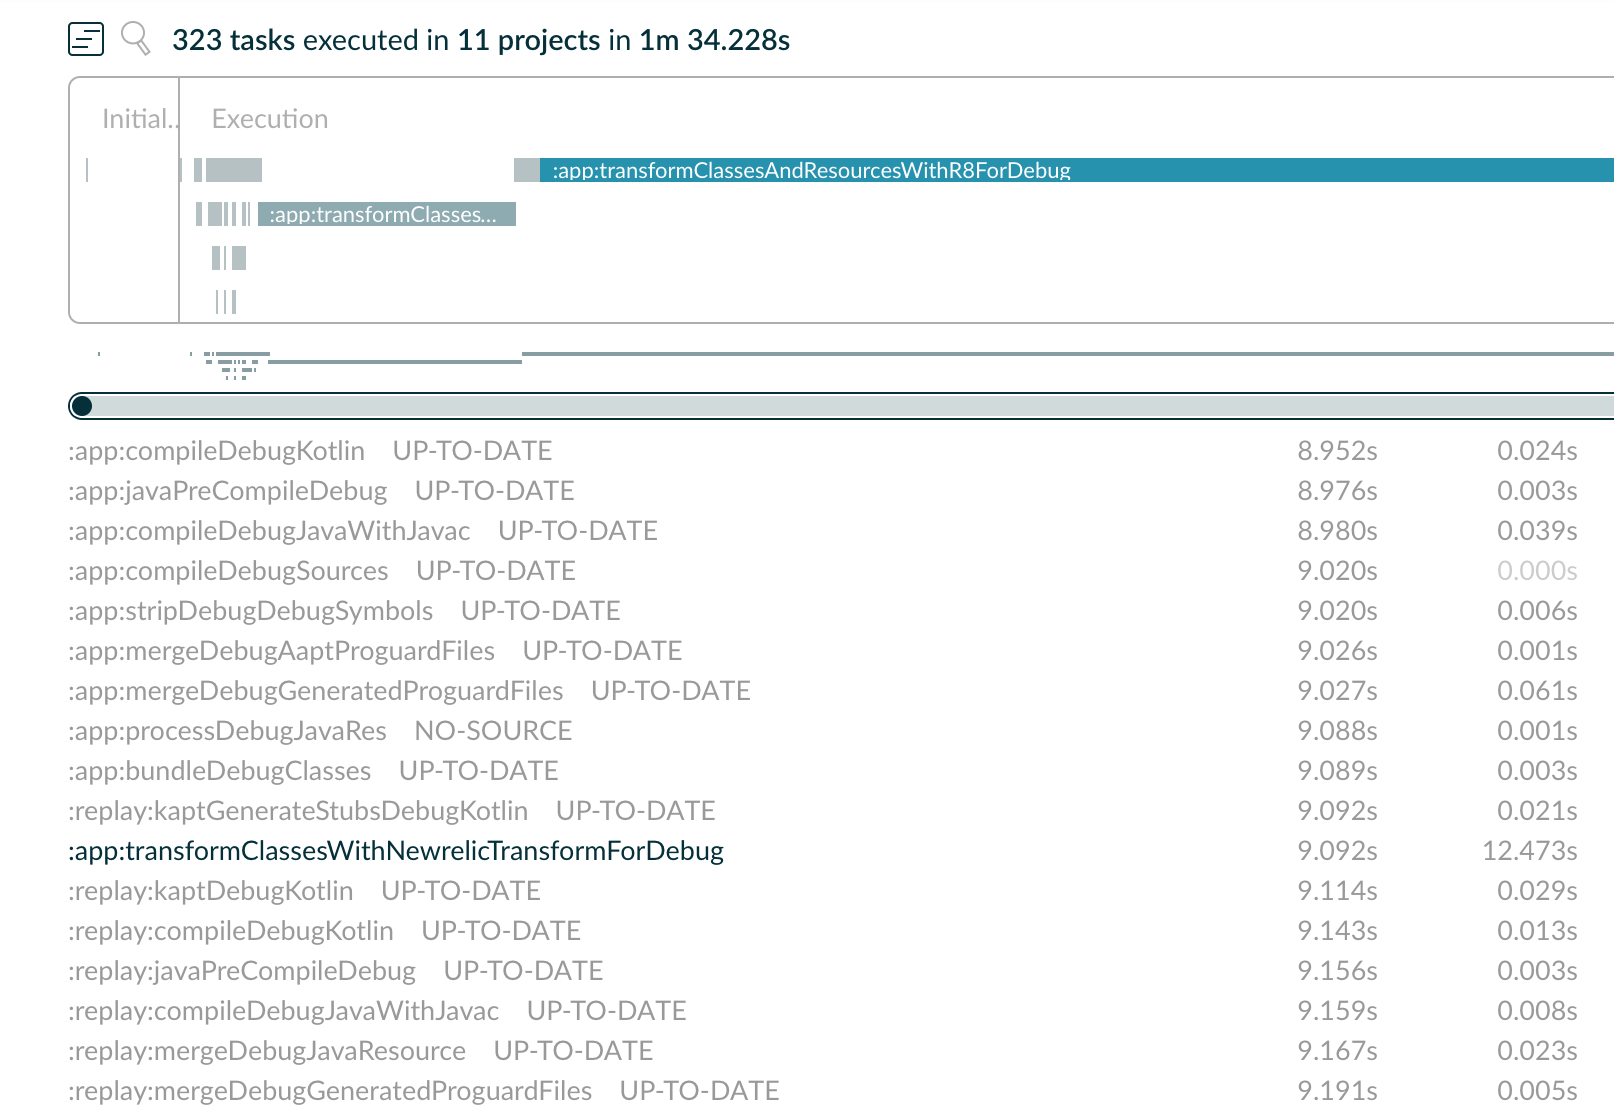
After figuring out the cause of the problem, I was able to rebuild with only a ten second build time. I can also see most tasks were up-to-date
$ ./gradlew --scan app:assembleDebug
238 actionable tasks: 2 executed, 236 up-to-date
I won’t go into detail about how to fix any not-up-to-date task. The fix will be specific to your situation. You should take care of these before moving on to the next section.
build cache
The previous “cache” applied only to your current project, on your machine. However there is another lesser known cache, called “build cache”. From Gradle’s documentation:
Build cache is a cache mechanism that aims to save time by reusing outputs produced by other builds.
Build cache allows several different improvements, the first is called “task output caching”. It’s important to note that “build cache” is not enabled by default.
Beyond incremental builds described in up-to-date checks, Task outputs can be reused between builds on one computer or even between builds running on different computers via a build cache.
Before you begin optimizing the task output cache, you should focus on the previous section to optimize incremental builds. Gradle says:
For your build to play well with task output caching it must work well with the incremental build feature. For example, when running your build twice in a row all tasks with outputs should be UP-TO-DATE. You cannot expect faster builds or correct builds when enabling task output caching when this prerequisite is not met.
The reason for this is that under the hood Gradle is using the same cache logic:
Task output caching leverages the same intelligence as incremental build checks that Gradle uses to avoid work when a previous local build has already produced a set of task outputs. But instead of being limited to the previous build in the same workspace, task output caching allows Gradle to reuse task outputs from any earlier build in any location on the local machine. When using a shared build cache for task output caching this even works across developer machines and build agents.
So let’s start to see what improvements we can get from reusing as much of the task output cache as possible.
Start by clearing the build cache:
$ rm -rf $GRADLE_HOME/caches/build-cache-*
For me this is in my home directory ~/.gradle/caches/build-cache-* although you are probably better off creating a $GRADLE_HOME environment variable instead of directly referencing this directory.
Next perform a clean and then assemble with --build-cache flag
$ ./gradlew clean
$ ./gradlew --build-cache --scan app:assembleDebug
Let’s see what is put into our local machine’s build cache
$ pwd
/Users/jasonatwood/.gradle/caches/build-cache-1

$ ls -al
total 124120
drwxr-xr-x  113 jasonatwood  staff      3616 Oct  3 15:01 .
drwx------   18 jasonatwood  staff       576 Oct  3 14:59 ..
-rw-r--r--    1 jasonatwood  staff       427 Oct  3 14:59 017f5e56f21552a6a50eb6d942f633f5
-rw-r--r--    1 jasonatwood  staff       435 Oct  3 14:59 03811c69107af0b5953512271b75166b
-rw-r--r--    1 jasonatwood  staff       449 Oct  3 14:59 03c7caabddcd1dbe1aae9ac745a92ecf
-rw-r--r--    1 jasonatwood  staff      2333 Oct  3 15:00 03ffea2601c560efaf72f55cfddd1b3b
-rw-r--r--    1 jasonatwood  staff      5531 Oct  3 14:59 0456f0191150213ce582da7b6c1f0d7b
-rw-r--r--    1 jasonatwood  staff       839 Oct  3 14:59 07b5ca08f6dae6df5b823a0b65def778
-rw-r--r--    1 jasonatwood  staff    452330 Oct  3 15:00 08b2684fbc7669f384febef316dd2db2
-rw-r--r--    1 jasonatwood  staff       827 Oct  3 14:59 0a578cefd73983b704772e2bcc03ba99
-rw-r--r--    1 jasonatwood  staff  21719749 Oct  3 15:00 0c8471f6d5f94660445043d9f3c81b39
-rw-r--r--    1 jasonatwood  staff     32028 Oct  3 14:59 0dacf14920dcec1b2ff435437c95f458
-rw-r--r--    1 jasonatwood  staff      4375 Oct  3 14:59 0ddf2becc4534bac58f5d71220591be6
-rw-r--r--    1 jasonatwood  staff       548 Oct  3 14:59 0ea884c73a92cab414710c1b69479773
-rw-r--r--    1 jasonatwood  staff    228341 Oct  3 14:59 10c48bd979936dcd3be75b32742f7069
-rw-r--r--    1 jasonatwood  staff       432 Oct  3 14:59 10c4c5d862ab3c7b515ecfe8dbad7078
-rw-r--r--    1 jasonatwood  staff      5173 Oct  3 15:01 11835204eee580f7a0ef5d5777468de9
...
Each one of these files contain reusable info for a specific task, where the filename is the build cache key :
Since a task describes all of its inputs and outputs, Gradle can compute a build cache key that uniquely defines the task’s outputs based on its inputs. That build cache key is used to request previous outputs from a build cache or store new outputs in the build cache.
It’s important to note that each task has to set itself as “cacheable” for this info to be saved. This doesn’t happen automatically:
Task types need to opt-in to task output caching using the @CacheableTask annotation. Note that @CacheableTask is not inherited by subclasses. Custom task types are not cacheable by default.
Luckily for us Android developers, Android Gradle Plugin and Kotlin Gradle Plugin both already opt in, as well as a bunch of built-in Gradle tasks:
There are third party plugins that work well with the build cache. The most prominent examples are the Android plugin 3.1+ and the Kotlin plugin 1.2.21+.
We can then re-run the build, without clearing build cache directory and see any time improvements:
$ ./gradlew clean
$ ./gradlew --build-cache --scan app:assembleDebug
The reason we still clean here is that we want to see what improvements we get just from build cache directory. You can compare times between your first build and second. You can also see from the output how many tasks are now cached:
First time:
238 actionable tasks: 175 executed, 49 from cache, 14 up-to-date

Second time:
238 actionable tasks: 36 executed, 185 from cache, 17 up-to-date
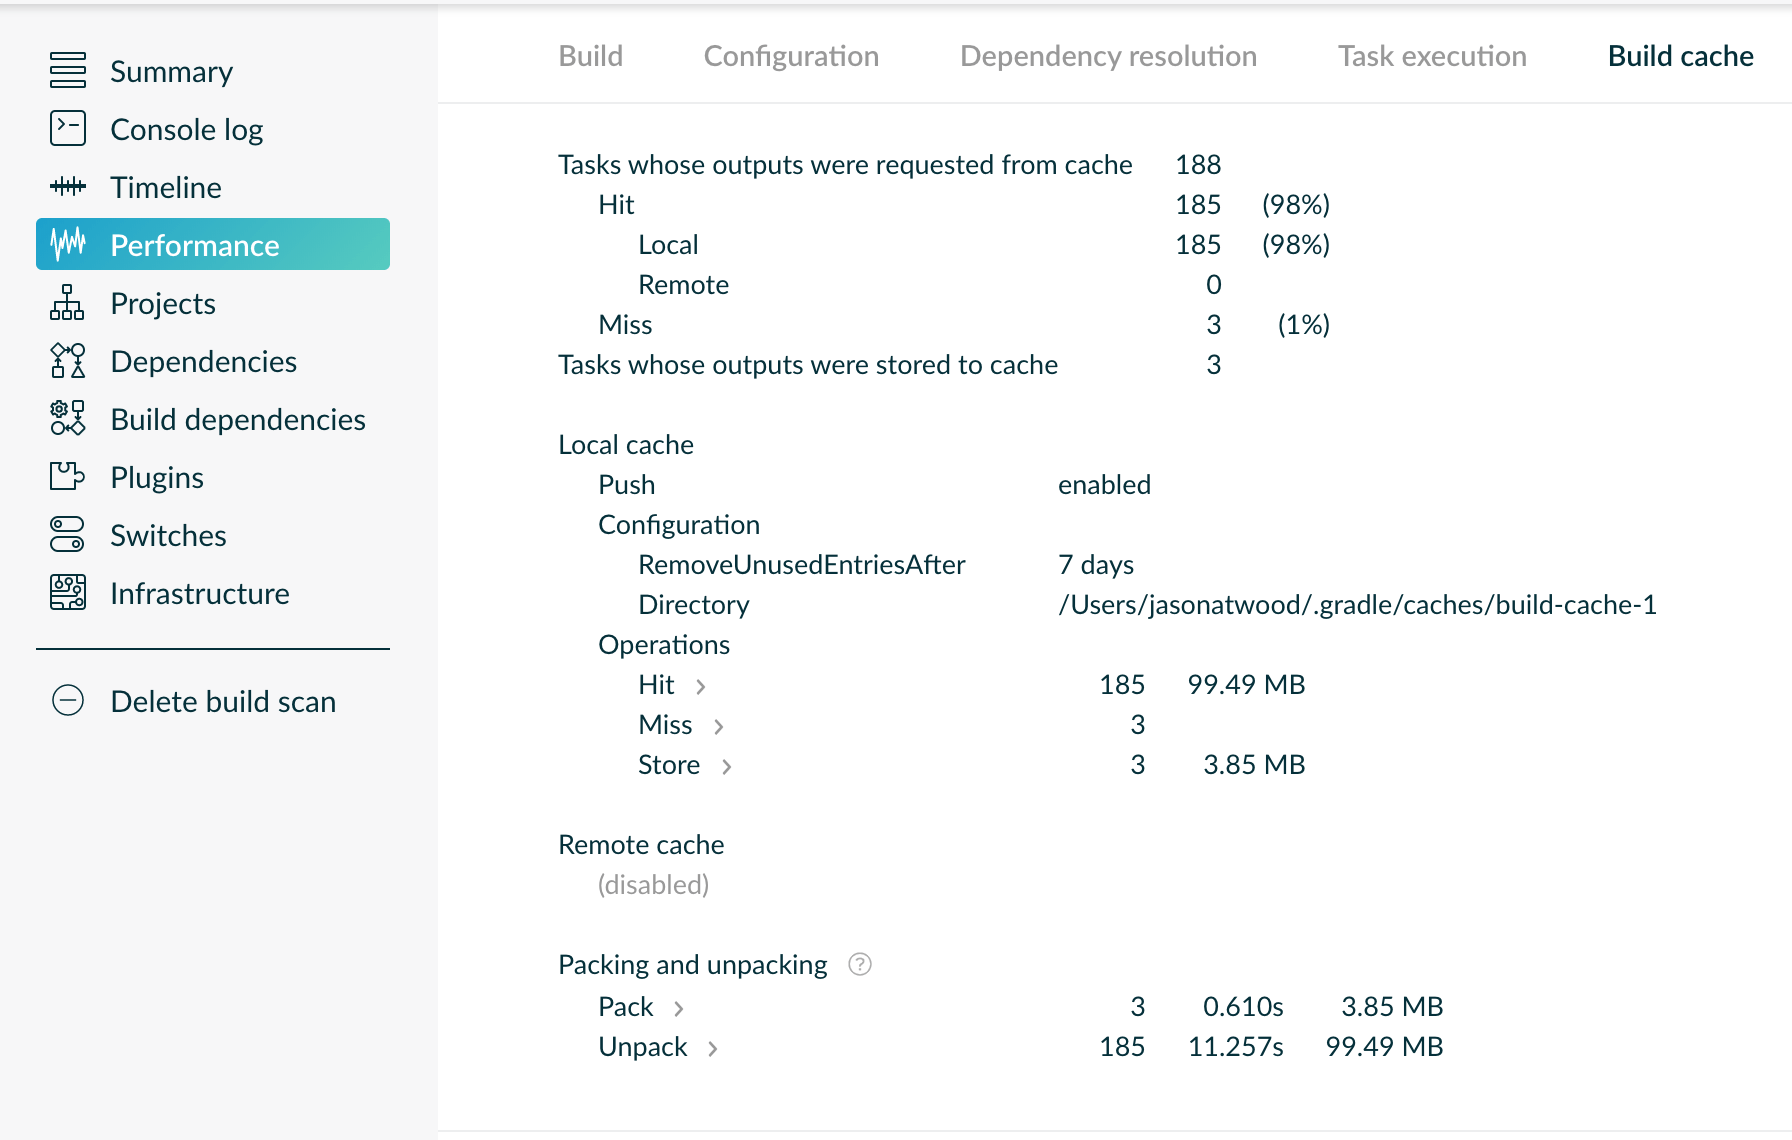
You can get further input on what was retrieved from the cache by looking at the scan report –> Performance –> BuildCache
Side note: You’ll see that even on the first build, some tasks are coming from cache. At fist this was perplexing to me. I don’t fully understand this but, if you look at the scan report, and then look at the cache for those FROM-CACHE task, and then search for those caches on your local machine, you’ll see that they were created at the same time as the rest of the “new” caches. In other words, it looks like Gradle is actually using the build cache within a single build. A step may have already been run and cached, and then it was needed to be run again so it was pulled from the cache.
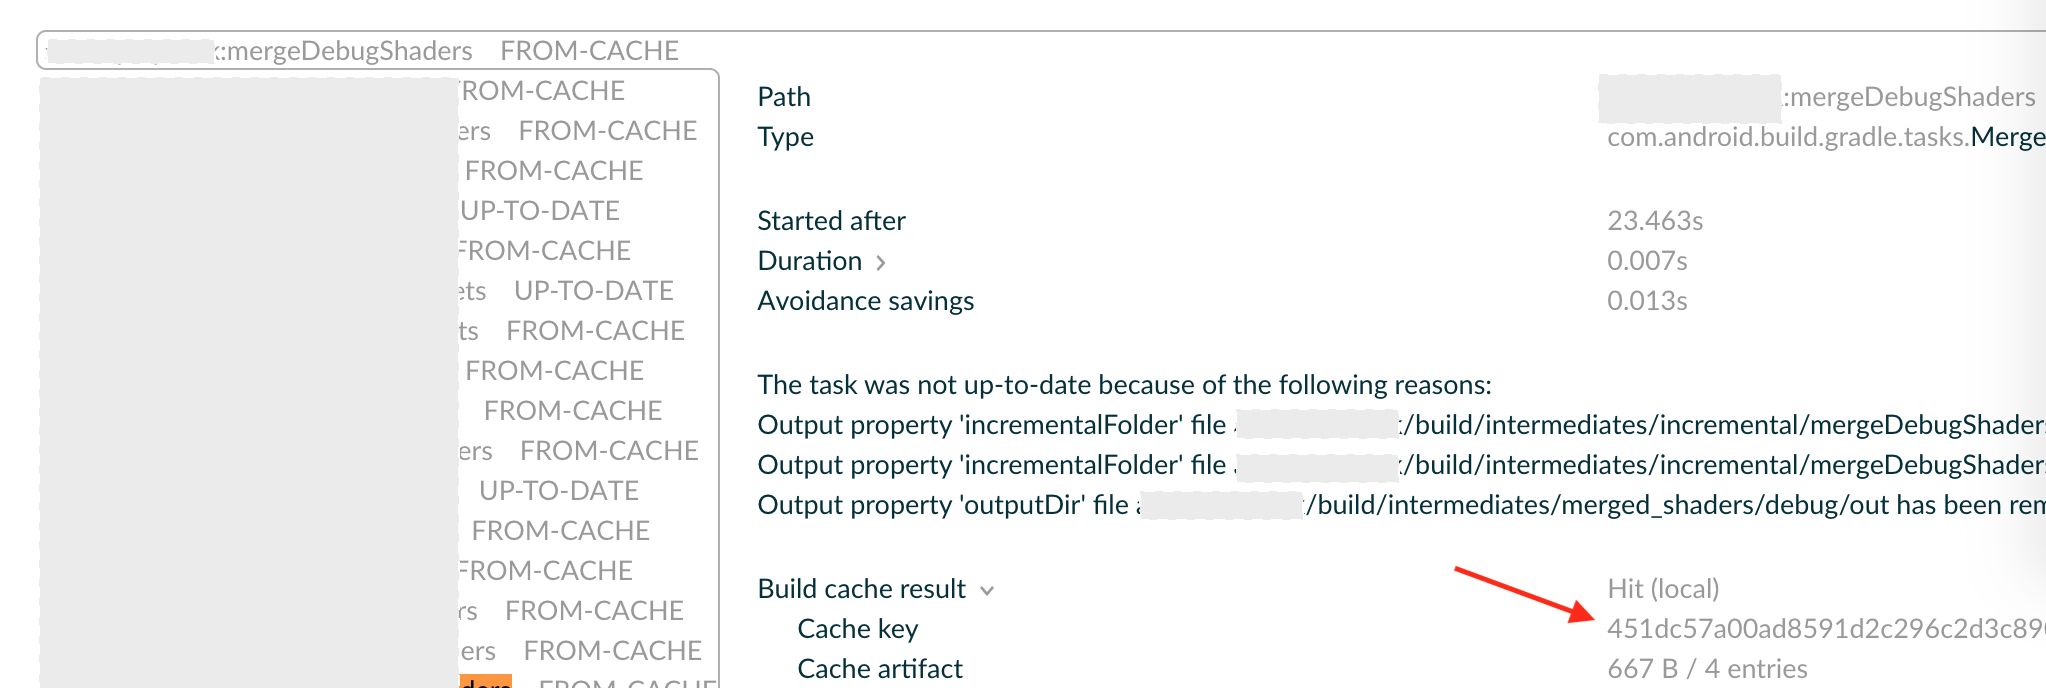
You can get the key for each cache from the scan report:
If you want to lower build times by using build-cache, Gradle has a whole guide on finding and fixing problems. The first part of this guide is the part I explained above about incremental builds.
Combine What We Have So Far
Let’s recap. We have “incremental builds” which can cache data for the same build, for the same project, on the same machine. We also have “task output caching” (build-cache) which can cache data for a specific task, across builds, across projects, and (as we’ll see later) across machines.
You want to get the former working first, and then tackle the later. We can then test the combined improvements.
# delete project-specific cache
$ ./gradlew clean

# delete build cache
$ rm -rf $GRADLE_HOME/caches/build-cache-*

# will take a while since it has to rebuild all the things
$ ./gradlew --build-cache --scan app:assembleDebug
238 actionable tasks: 172 executed, 49 from cache, 17 up-to-date
Don’t change any code and run:
$ ./gradlew --build-cache --scan app:assembleDebug
238 actionable tasks: 2 executed, 236 up-to-date
If everything is working with incremental build you probably won’t see any improvement by using build cache in this case. Remember the caching logic is the same for incremental builds and build cache, so in our above build we didn’t need to pull from the cache because everything was already “up to date”. So you’re now probably asking, what’s the point of this second cache if incremental build does most of this for us?
Benefits of Adding Build Cache
One benefit that I get from using build cache is improving build times after having to delete build directories. These directories contain more than just cached data for a current build. I regularly find myself calling ./gradlew clean to clear out all sorts of cruft generated by Gradle that I don’t want clogging up the nav window in Android Studio (we use several report-generating Gradle tasks that spew a lot of garbage). So even though I’ve deleted these outputs (and therefore most tasks are not up-to-date), I do still have valid task caches in the build cache.
The second reason is caching across different builds on the same machine. If you have multiple Gradle projects in different directories but on the same machine, with similar enough code (maybe you use the same git submodules to pull in some Gradle modules for multiple projects) then the build cache will allow you to share resources across projects. This also helps when you have two checkouts of the same project in different folders. You may do this if you want to test a pull request but don’t want to stash or apply your working copy. Let’s try that now:
# get remote copy of master
git checkout master && git pull

# delete project-specific cache
$ ./gradlew clean

# delete build cache
$ rm -rf $GRADLE_HOME/caches/build-cache-*

# build once to generate build cache
$ ./gradlew --build-cache --scan app:assembleDebug
238 actionable tasks: 175 executed, 49 from cache, 14 up-to-date

# change directory and clone fresh copy
$ cd ..
$ mkdir temp_copy
$ cd temp_copy
$ git clone ...

# build fresh copy with build cache
$ ./gradlew --build-cache --scan app:assembleDebug
238 actionable tasks: 36 executed, 185 from cache, 17 up-to-date
We can see that on this fresh clone, Gradle was able to use build cache generated by other instance of this project, in another directory.
A final reason to use build-cache is sharing a cache across machines. This is a big deal if you have multiple developers and/or a C.I. machine that essentially has a fresh set of build directories for each build. We’ll talk more about this later.
More Thoughts on Build Cache
It’s important to note that a task can be made cache-able even if the task (i.e the task’s authors) do not opt in by using @CacheableTask. Enabling this is outside the scope of this post but you can learn more here. If you are a Gradle plugin author you can use the above tests to see if your tasks are being cached and update your project accordingly.
Earlier, I said that build cache allows several improvements, the first of which is task output caching and the performance benefits that come with it. Another improvement that build cache enables is called composite builds. I won’t go into detail on composite builds, but the docs describe them as “simply a build that includes other builds”. You can see how caching one build would speed up another.
So far we’ve always been using --build-cache flag to enable build caching. We did this so we could easily turn it on or off to get a comparison. However if you are set on using build cache you should update gradle.properties:
org.gradle.caching=true
This way you don’t have to add the flag to every Gradle command you call.
What about Kotlin projects? Kotlin Gradle Plugin already does caching, however caching kapt output is experimental and potentially unstable.
A big thanks goes to Martin Marconcini for reviewing this post.
We’ll leave off here for now. In part 2 we’ll talk about additional Android Gradle Plugin caching, Daemon “caching”, and third party dependency caching.